Friday, November 25, 2011

Document Your December

There is a great new Christmas Collection out today at The Lilypad. It's called Document Your December, and it is basically a BYOC with Christmas products. How cool is that?? I have mixed and matched a bunch of these products to make the base pages for my December Daily album. I am loving how they're coming along so far!

DYD 2011

DYD 2011

DYD 2011

Credits:
No Peeking papers and Pocket Stuffers by Valorie Wibbens
Half Rounds by Amy Martin
Journal Everyday and December Bits by Sabrina Dupre
A Christmas Collab by Micheline Martin and Fruitloop Sally
Big Ol' Tags 3 by Lauren Reid
Very Merry embellishments by Precocious Paper and Sahlin Studio

I also used two products by Sahlin Studio to make a quick welcome card for my mom. :)


I bought a cheap watercolor set this past weekend, and I am loving it! :)

Welcome card

Thursday, November 24, 2011

Happy Thanksgiving!

Happy Thanksgiving! I am so happy to be spending it with my mom and my husband! It's a first! :)
Here is last week's P52 Cards picture.

P52 Cards - Week 47

You can see the Week 47 card here.

Wednesday, November 23, 2011

Thanksgiving Weekend

As we're getting ready for the Thanksgiving celebrations, Black Friday and the awesome Document Your December releases coming Friday at The Lilypad, I squeezed in another page for my mom's previous visit's album. :) But first let me give you a sneak peek of what is coming. :) I've been working on my Daily December pages for this year with these new products, so make sure you check back to see them on Friday. :)

document your december

Anyway, going back to today's 50% off specials, I used these awesome templates by Amy Martin:

Mom's Visit Day 13 - Sassy Shoes

Here's my page:

Mom's Visit Day 13 - Sassy Shoes

Credits:
Garland mini v3 by Amy Martin
Sass Mouth and Sass Mouth Alpha by The Tattered Pearl
Petalicious by Kaye Winiecki
Sugar Shock font bundle by Lauren Reid and Darcy Baldwin
Font: Pea Pumpkin Peters

Tuesday, November 22, 2011

Goodbye ScrapMatters!

After many years, it is time for me to say goodbye to ScrapMatters. It has been my digi home for three years so allow me to reminisce a bit. :) I have been on the CT there for over two years, and the hybrid CT leader for almost two years. Yes, it has been a very long love affair. I did my very first speed scrap at ScrapMatters. I still remember the summer of 2008, when the site reopened with lots of games and prizes during the Olympic Games, and I was instantly hooked. The community at ScrapMatters has always been friendly and supportive, and I felt at home right away. I got into hybrid because of the It's In the Cards challenges there, in October 2008 - I fell in love with hybrid and the rest is history! I won a guest spot on the CT by finishing in the top posters for Queen of Scrap in 2009; during my guest spot I applied to the hybrid creative team call and got accepted, thanks to Kari's (then hybrid CT leader) and the other hybrid designers' support; a few months later Kari left to be a designer at Jessica Sprague's shop, and I was asked to be the hybrid CT leader. In my role as hybrid CT leader I met my best digi friend, Kim (kimbytx), who was asked around the same time to become digi CT leader. Kim and I have been through a lot together: CT calls, designer assignments, and much more. I have met so many good friends during my time at ScrapMatters, and have been endlessly inspired by incredibly talented scrappers - I am especially in awe of the rockin' hybrid girls! I hope to have inspired people with the monthly hybrid tutorials I wrote for the newsletter first, then for the quarterly magazine. I met many of my all-time favorite designers at ScrapMatters, some of whom have asked me to be on their CT (Jenn and Krista, I wub you!!). I value tremendously the opportunity to work with the newsletter team - such a talented bunch of ladies! It was a pleasure to collaborate with so many wonderful people and I will be forever grateful for being part of the team at ScrapMatters. It is now time for me to move on, but I will carry these special memories in my heart.

My Creative Teams

Here is a list of the creative teams I'm currently on, and the ones I have been on in the past (both as guest and as permanent member). The names are linked to the posts on my blog, the blinkies are linked to the stores (when applicable). Disclaimer: I get free products from these designers/stores, but I only scrap with stuff that I can use and love.

Current Teams:

Past Teams:
  • Studio Calico- Dec. 2015 - Dec. 2016
  • Ali Edwards - 2015 digital creative team
  • Digital Design Essentials - October  2012 - Feb. 2016
    digi team (on leave)
  • Mari Koegelenberg - June 2009 - 2015 (on leave)
  • Jenn Barrette - October 2010 - 2015 (retired)
    hybrid team
  • Write.Click.Scrapbook - July 2013 - May 2015
  • Leora Sanford - October 2011 - September 2012 (retired)
    digi team 
  • Ju Kneipp - April 2011 - Dec. 2012
    freelance
  • Scrap'It Designs - October 2008 - October 2012
    digi team - my very first CT! ;) Bree sadly retired from designing in October 2012.
  • ScrapMatters - June 2009 - November 2011
    hybrid CT: June - December 2009; hybrid CT leader: January 2010 - November 2011
    other duties: monthly hybrid tutorial(s) for the newsletter/magazine.
  • DeCrow Designs - November 2010 - May 2011
    digi team. Molly was selling at ScrapOrchard, and retired in May 2011:-(
  • Polka Dot Plum - December 2008 - September 2010
    digi team. Lauren and Amy were selling first at Sunshine Studio Scraps and ScrapOrchard, then they opened their own store, Polka Dot Plum.
  • Amy Sumrall - June 2009 - April 2010
    hybrid/digi team. Amy was selling first at The DigiChick and then at The Lilypad, she retired in April 2010.
Guest Spots:

    Monday, November 21, 2011

    Lots of Crafting Projects!

    I have been busy creating this weekend, since it will be a while before I can craft again, with my mom being here. I have started my December Daily album and i am loving how it's coming along! Jenn Barrette and Krista Sahlin have teamed up to make this fabulous Christmas kit that inspired my to start on this year's December Daily project. :)


    It is available at The Lilypad and at Sweet Shoppe Designs. Plus there are some fantastic add on packs:


    This is what my first pages look like. I recolored a few items to match my color scheme. More peeks to come towards the end of the week! :)

    December Daily 2011 - base (1)

    I have not decided what date these pages will be for yet, that will depend on what pictures I have for each day.

    Another big project I have committed to for next year is Project Life. I am in the process of buying the binder and the paper kit, and I am excited to start. I will also be printing out digi goodies to fill my album, and the new collection by Jenn Barrette and Kristin Cronin-Barrow is simply perfect for this!


    The colors are really versatile, and I am crazy about those journaling pieces! :) I made this card to start with. :)

    Happiness Lives Here card

    I also made a card for DH's birthday this week. I had fun making this - it uses a digital stamp and it is my first time using one!
    That owl is so cute! I followed a tutorial by Trish on how to digitally color stamps (well... truth be told, I skipped a few steps, but it worked for me ;) and I will be using digital stamps again for sure! :) ).
    Birthday Card 2011

    Credits:
    Hoo-ray Digital Stamp by Kaye Winiecki
    Background paper from Bring on the Cake by Karah Fredricks, Kate Hadfield and Kaye Winiecki
    Colored with brush from Finishing Touches 6 by Karah Fredricks

    Have a great week! :)

    Sunday, November 20, 2011

    Hybrid Christmas Tree Tutorial

    In this tutorial I will be showing you how to make a paper tree. I love three dimensional hybrid projects, but I'm always pressed for time during the holiday season, so I selected this project because it is especially easy to make but yields an impressive result. This project was inspired by Martha Stewart.

    Photobucket

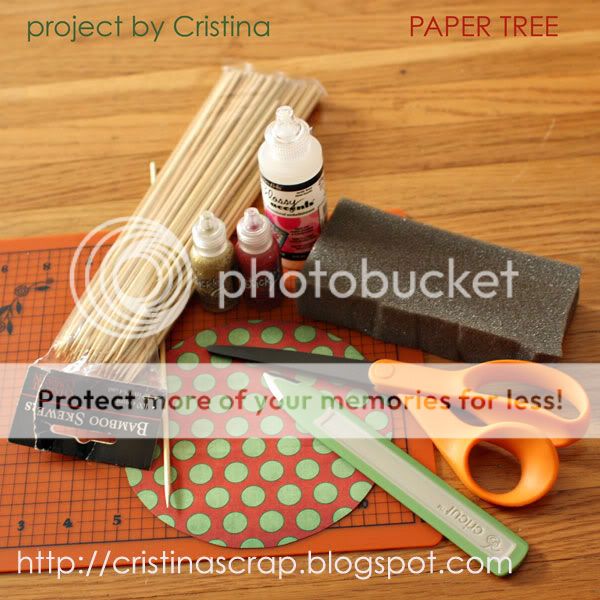
    In addition to being fairly quick, this is also a thrifty project; chances are you already have all that's needed in your home right now. You will need digital supplies (I used the kit "Once Upon a Shabby Christmas" by Haynay Designs), matte presentation paper, printer, scissors, bone folder, bamboo skewers, up-cycled foam from shipping packaging, hot glue gun or Glossy Accents, and optional decorations like glitter glue, buttons, sequins, etc.

    Photobucket

    If you look at the completed project, it might be hard to believe that it's made only of paper circles, but that's exactly all it is! I have used circles of 2", 3", 4", 5" and 6" diameters. If you want to make a smaller tree, skip the 6" circle.

    Once you have printed out the circles (I used matte presentation paper for this project), cut them out. Your cuts don't have to be precise, so it will be very quick to cut the circles out. Here are the steps for making your Christmas tree:
    1. Start with one paper circle.
    2-4. Fold it in half using a bone folder.

    Photobucket

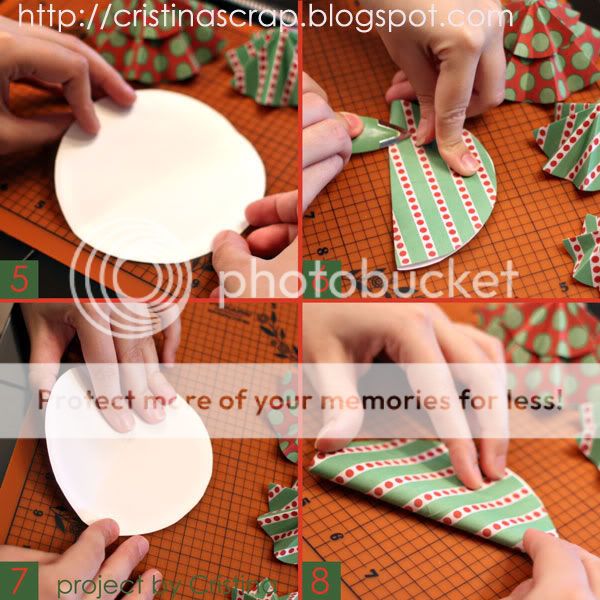
    5. Open up the circle.
    6. Fold it in half again, at 90 degrees with the previous fold.
    7. Open up the circle.
    8. Make another fold in between one of the previous folds.

    Photobucket

    9. Make a fourth fold, at 90 degrees with the latest fold.
    10. You have made four folds, so your circle now has 8 equal segments.
    11-12. Now we're going to fold the circle inside out and make four more folds, in between the first four.

    Photobucket

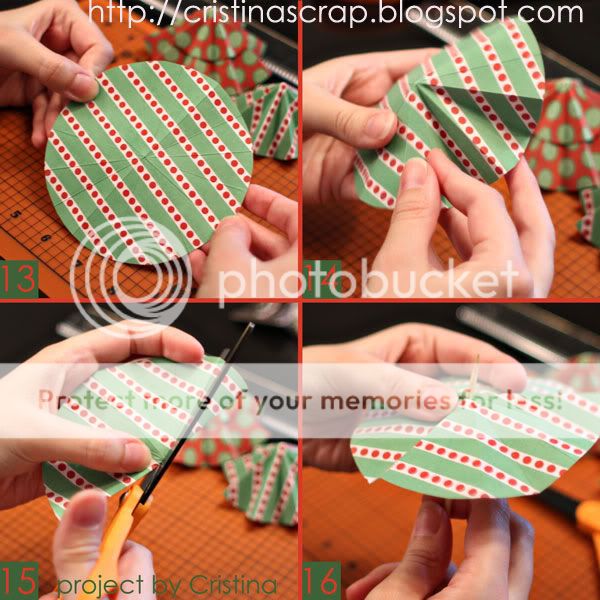
    13. Once you have completed the 8 folds, the circle is divided in 16 equal segments.
    14. The folds are alternating, one towards the inside and one towards the outside.
    15. Cut a small hole at the center of the circle.
    16. The size of the hole has to be big enough for the skewer to fit through.
    Repeat steps 1-16 for all the paper circles you have.

    Photobucket

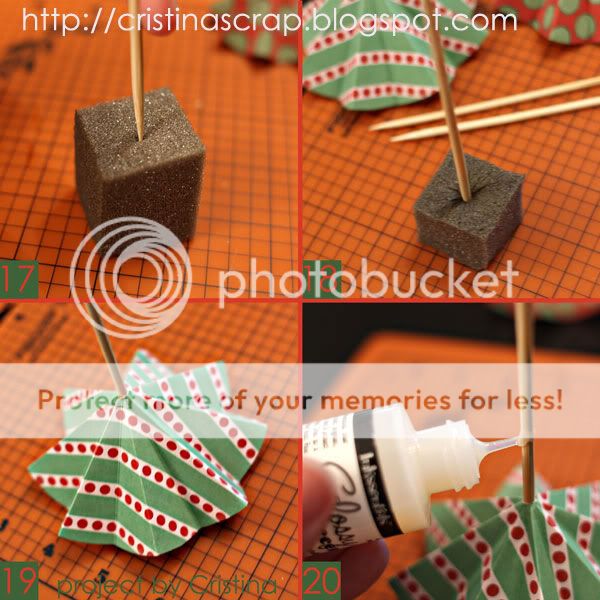
    17-18. Cut a piece of foam shipping material into a cube and poke a hole in it with the skewer.
    19. Insert the biggest folded paper circle onto the skewer.
    20. Apply glue (hot glue is the easiest; I don't have a hot glue gun so I used Glossy Accents - you will have to hold the paper in place until the glue dries) on the skewer in correspondence of where you want the next smaller paper circle to go.

    Photobucket

    21. Insert the folded paper circle and hold in place until the glue dries.
    22. Repeat for smaller folded circles.
    23. Cut the skewer after you have added the last folded circle.
    24. Decorate the tree top as you wish. I used Stickles glitter glue.

    Photobucket

    The tree is ready! You can decorate it further if you wish, using more glitter or fake snow or beads.

    These simple paper trees make such a festive decoration! You can use them as place holders for the Christmas table or to decorate the house for the season - the possibilities are endless, and nobody will ever believe they were so easy to make!